Step by stepLast
I spent many, many hours, thinking about the different ways to achieve many of the solutions shown on this page. Just to re-iterate that I'm not a mechanical engineer by trade so some of the solutions probably could have been made simpler, or done in a different way.
However, like I've said on this site before, I've been working mostly off my own initiative, but with some feedback from visitors Emails.
And at the very forefront of my thoughts, safety has been my number one priority. If it doesn't look right, then its usually unsafe too! And I can't have the car falling to bits around me when I'm pulling 7250 rpm in fifth, travelling at speeds in excess of 100 MPH!!
Here are the 10 steps required to install the Zetec engine in your Fiesta Mk1
1. Obtaining & preparing the engine
2. Change the sump and oil pickup pipe
3. Change the water pump
4. Change the flywheel/clutch
5. Modify the chassis rail
6. Modify engine cradle
7. Relocate engine cradle
8. Create a new engine mount
9. Create an engine steady bar
10.Relocate the brake servo
But which Zetec engine do I need?
There are four different 16V Zetec engines used in the late model Fords (1990->), the Series 1 Zetec, Series 2 Zetec-E and the latest Series 3 Zetec-R, not to mention the Yamaha developed all alloy Zetec-S engine. We're only concentrating on the non-Zetec-S variants.
So how do I tell them apart?
The Series 1 Zetec has DOHC 16V cast in to the top of the cam cover. This engine is prone to the sticking valve problem, common amongst most series 1 engines. Symptons are a rough idle and difficulty starting when cold. The valve problem is overcome by using the 5W30 grade of engine oil.
The Series 2 Zetec-E has 16V Zetec cast in to the top of the cam cover. This is the engine which this project is based upon. There is very little external difference between the Series 1 and 2 engines so the modifications listed should apply to both engines.
The Series 3 Zetec-R has either 16V Zetec or Zetec-R cast in to the top of black acrylic coated and more rounded cam cover. This engine is quite different to the earlier series 1 and 2 engines, and I'd expect compatability problems when following the modifications listed on this site, if you decide to use this engine. Check out the following link to Mark Stewarts web site which gives more detail on the different types of Zetec engine's available. His site can be found at www.mwstewart.co.uk
1800 or 2 litre ?
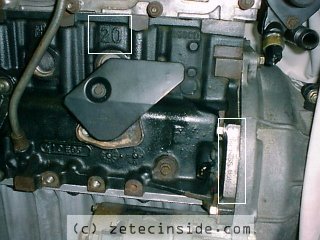
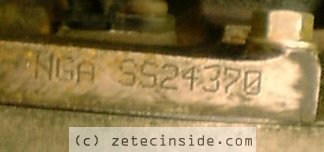
Only the 2.0 engine features oil cooling jets which spray oil over the base of the pistons and of course the 2.0 will ultimately produce more torque/power when tuned. But using a 2.0 engine pushes up the costs a little as its more expensive to buy 2nd hand usually, and requires a change of sump and oil pickup pipe.
Identifying your 2.0 Zetec engine is quite easy, though not obvious when the engine's covered in manifolds and grime. First, the engine number starts with the initials NGA. If you look on the front of the engine, the engine number is etched in to the block next to the gearbox bellhousing. The other identification mark is a large 20 cast in to the block. This is at the top of the front of the block, and is obscured by the exhaust manifold.


So just what are the 10 steps to installing a Zetec engine?
1. Obtaining & preparing the engine
2. Change the sump and oil pickup pipe
3. Change the waterpump
Why? Well the difference between the 1.8 Escort/Fiesta water pump, and the 1.8/2.0 Mondeo water pumps, is that they spin in opposite directions. You see, on the Mondeo there's a serpentine drive belt driving the water pump and ancillaries. When you use a triangulated drive belt setup, the water pump is driven in the opposite direction to the serpentine belt setup (see diagram).
So if you are not using the serpentine drive belt setup, you must change the 1.8/2.0 Mondeo pump for the Fiesta or Escort Zetec 1.8 water pump.
For the later black top, or series 3 Zetec from the Focus, the solution is a reversed impellor from a place called Quicksilver Race Engines in the States, or an idler pulley made up to run the pulley in the same way as stock.
The two pictures below show the two different arrangements for driving the water pump. The serpentine system, as used on the Mondeo, and the triangulated system, as used on the Fiesta.
Key to pulleys: A = Alternator, W =Water Pump, C = Crankshaft
The Serpentine system (Mondeo)
The Triangulated system (Fiesta)And how is a Zetec cooled? Check the diagram below to see how the water circulates before and after the thermostat opens
4. Change the flywheel/clutch
5. Modify the chassis rail
6. Modify the engine cradle
I decided to keep the flange, and relocate the engine cradle by 20mm to offset the offset! However, I've heard of a few people who simply decided to remove the flange altogether, therefore saving the effort of slotting the support bracket, and offsetting the cradle mounting points. Its up to you what you decide to do. If you're in a hurry, and you're not worried about losing some strength where the sump bolts to the gearbox then remove the flange. If you want maximum strength, retain the flange, slot the mounting bracket and relocate the cradle mounting points like I did [Step 7 below]. Its entirely up to you.
7. Relocate the engine cradle
8. Create a new engine mount
9. Create an engine steady bar / tie bar
10. Relocate the brake servo / replace with a Pedal Box
Why not fit an Escort Mk2 Pedal box from Rally Design, and save a whole load of weight? I carried out this conversion in 2006, and have been very happy with the results. See the Brakes page for more information. Note that master cylinder reservoirs are not allowed inside the passenger compartment. They present a fire risk, and are strictly outlawed in motorsport in the UK. So reservoirs must be located inside the engine bay.
So thats it then?
On the Mk1 Fiesta theres a two piece drive shaft thats supported by a bearing on the back of the engine. You can't fit the bearing to the same place on the Zetec engine, because theres no place to bolt it to. So my advice is to upgrade now to the Mk2 driveshafts, which are tubular and theoretically stronger anyhow.
And then theres a problem with the alternator pulley fouling the TCA Tie Bar. The Fiesta Centre sell a Tie Bar kit which you can use to replace the existing Mk1 tie bar, and it gives you plenty of room where the alternator sits, so it's a worthwhile modification in the circumstances. However, the handling is less than ideal with the kit on the car, as the tie bars are too long and you end up with no caster angle on the front suspension.
You'll have to get an exhaust manifold built. I've opted for a 4-2-1 manifold, supplied by Ashley Performance Exhausts. They kept the car for a week to hand fabricate the manifold and system. I told them I wanted as quiet a system as possible, and they obliged by fitting a Golf GTI 16V silencer, and the car now only registers 94db at 4000 rpm, which is very, very quiet. Nice! The pipe diameters are 2.25" for the final system, 1.85" for the two collectors, and 1.5" for each of the four branches on the manifold itself.
There's no other traps to fall in to. Its not a job for a weekend by any means. Indeed I started my transplant in 1998, but theres a lot of other jobs I've had to contend with, like fitting bigger wheels, bodykit, roll cage, fuel system, injection system, uprated brakes, new wings and sills, respraying the car, keeping the web site updated etc etc.
And finally, just in case you'd forgotten (I know I had) what it looked like, this is how a standard 1600 Crossflow powered XR2 should look, alongside my 2.0 16V Zetec conversion.

Tuning

