Tuning the Zetec - Page 3
LastChange the camshafts and fit vernier pulleys
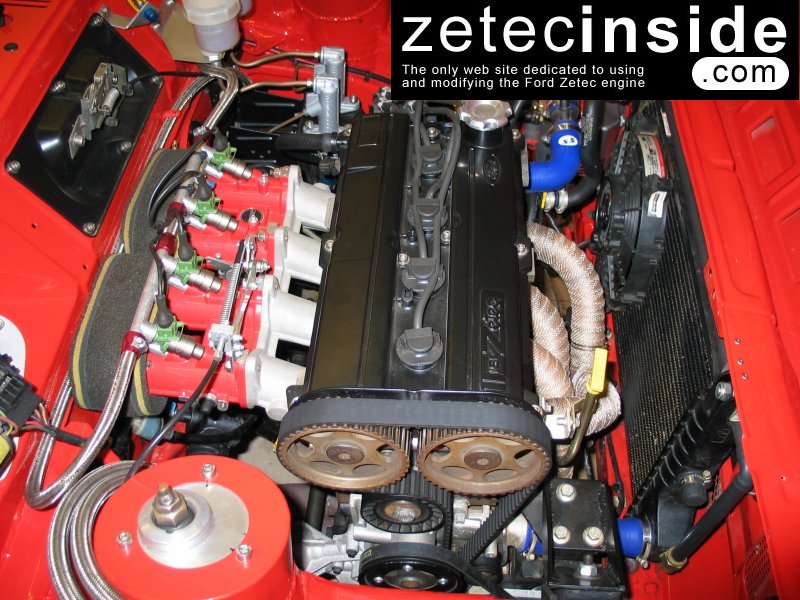
March 2004: The standard 2.0l cams are good for around 165BHP running on after-market fuel injection. Back in 2004 I received some sponsorship from Piper Cams,, and they've provided a pair of BP270BH's which work well with standard cylinder heads and pistons. With these fast road cams, there is no need for additional piston cut outs, and they're good for an extra 16 BHP over the standard cams.This guide is intended to assist you with the task of replacing camshafts on the Zetec engine. I take no reponsibility for any problems you may have when following the guide. I've double checked everything here, but like everything on the world wide web, articles are prone to error, though hopefully there are none below.
You can change the cams when the engine is warm if you wish, but for your own safety I'd recommend that the procedure is followed on a stone cold engine. Otherwise you may burn yourself on hot oil or other mechanical parts.
| Timing specifications for the Piper BP270BH Fast Road cams | ||
| Power band | 1800-6800 RPM | |
| Power increase | 16 BHP | |
| Inlet | Exhaust | |
| Duration | 264° | 260° |
| Valve lift | 10.03mm | 9.32mm |
| Timing | 22-62 | 60-20 |
| Full lift | 110° | 110° |
Fitting the new cams
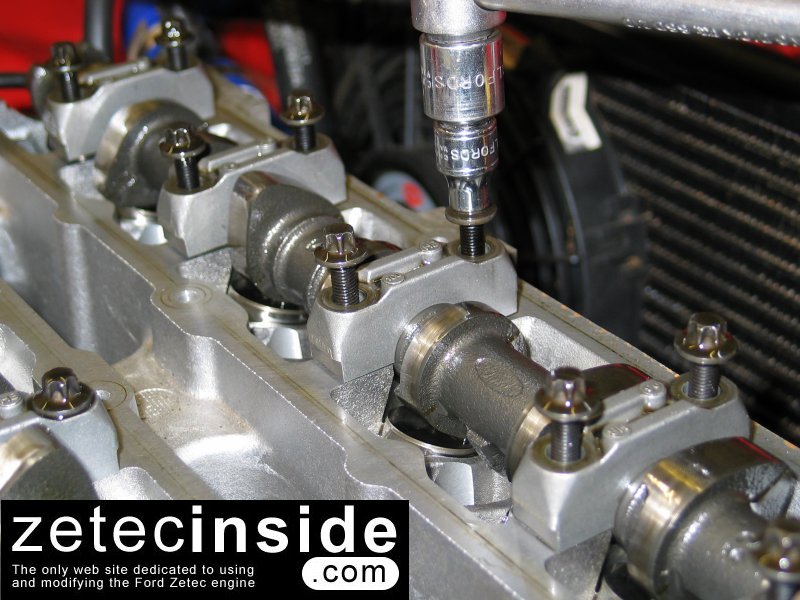
- Remove the spark plug leads, spark plugs, and camshaft cover.
- With the car in gear, and the plugs removed, rock the car backwards/forwards until the pistons #1 and #4 are at TDC (Top Dead Centre), and the slots in the ends of the camshafts are horizontal, and above the level of the end of the cylinder head. This means that the cam shafts are under no strain. None of the valves are currently held open, which makes for an easier removal and refitting procedure. We will manually dial the camshafts back in to their correct timing positions at the end of the procedure. If you have access to the crankshaft pulley bolt, use a T-bar and the appropriate sized socket to turn the engine. [In my installation, I can't get to the bolt, so I have to remove a road wheel and turn the drive shaft with the car in gear to rotate the engine.]
- Slacken the cam belt tensioner and remove the timing belt from the two camshaft pulleys.
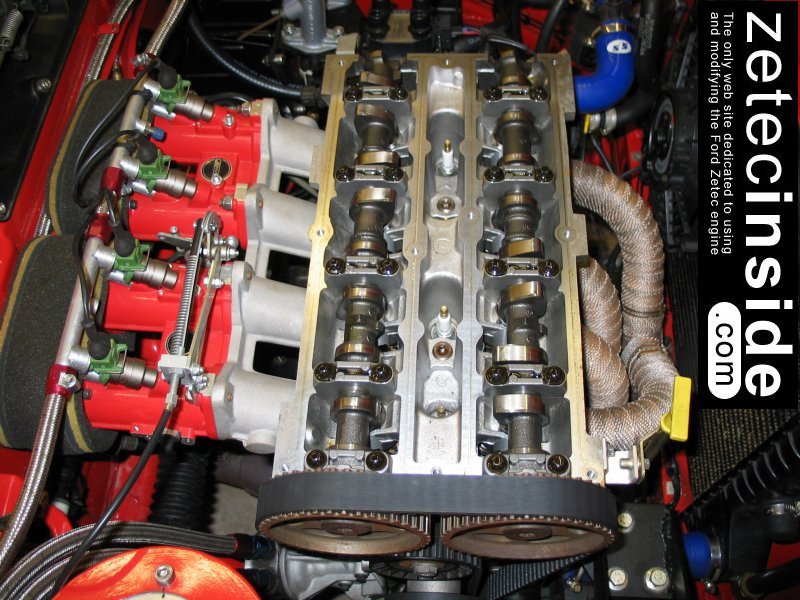
- Lock both camshafts using the slots in the ends of the cams or use the appropriate tool to hold the pulleys in place, undo the pulley bolts, and remove the pulleys.
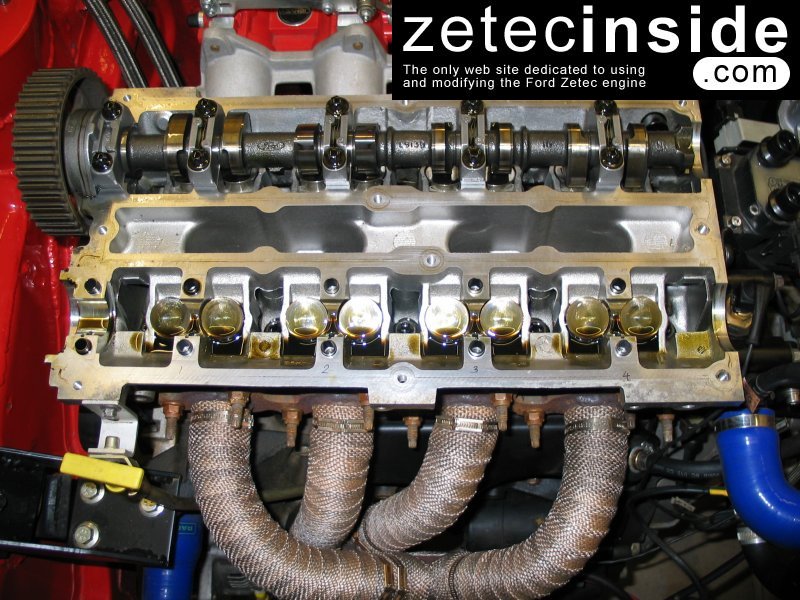
- Undo the camshaft bearing caps, and place them in a safe place. They are numbered from #0 to #4 (exhaust), and #5 to #9 (inlet)and must go back in their original locations when refitted. The caps nearest the pulleys (#0 and #5), also house an oil seal, and this should be replaced whenever the cams are replaced.
- Remove the camshafts and store in a safe place.
- Liberally coat the cam bearings with clean engine oil.
- Replace the camshafts with the new items, taking care to place them the correct way round. (On the Zetec the inlet and exhaust camshafts can be identified by an extra casting on the end of the inlet camshaft, where it sits next to the camshaft sensor located at the back of the head.)
- Fit the new camshaft oil seals in the end caps, #0 and #5.
- Replace the bearing caps in the same order they were removed (#0 and #5 nearest the cam pulleys) and tighten back down to the appropriate torque setting, and tightening in the right sequence.
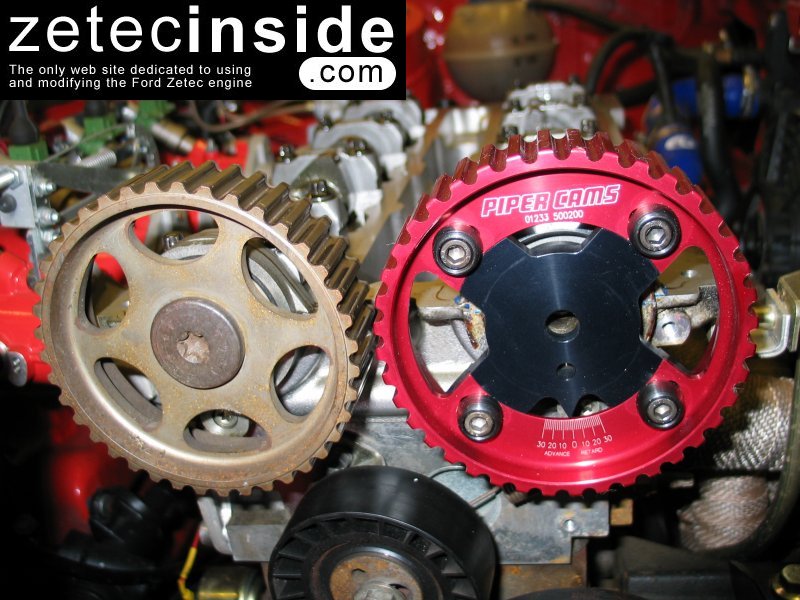
- Fit the vernier pulleys, but only finger tighten the pulley bolts.


Once both the camshafts have been replaced, you need to time them according to the specifications supplied by the camshaft manufacturer. The Piper BP270's that I've used are both set to give full lift at 110°. That is, after 0° TDC (ATDC) for the inlet cam, and before 0° TDC (BTDC) for the exhaust cam. [Note: TDC means Top Dead Centre and describes the position of the piston being at the top of the stroke, with the crankshaft at either 0deg; TDC or 180° BDC = Bottom Dead Centre]
To make this easier to picture, if you imagine that the #1 piston (nearest the water pump) is moving up the cylinder on the exhaust stroke (eg expelling all the exhaust gasses from the #1 cylinder), the exhaust camshaft opens the exhaust valves fully as the crankshaft is rotating (clockwise as you view the crankshaft pulley) and when the position of the crankshaft pulley is at 110° before top dead centre the exhaust valves are by now fully open. As the piston continues upwards and it reaches TDC, the exhaust valves should now have fully closed, and the piston now drops down inside the cylinder, and as it does so the inlet valves start to open, and only when the crankshaft is at 110° after top dead center are the inlet valves for cylinder #1 fully open. Then as the crankshaft continues to rotate, the inlet valves close, and the piston is pushed up the cylinder, on the compression stroke. When it reaches TDC (or near) the spark plug fires, and ignites the mixture, and the explosion pushes the piston down. Once it goes down the cylinder past BDC, and starts to rise again, we repeat the whole cycle with the exhaust camshaft starting to open the exhaust valves, which allows the piston to force the exhaust gasses out past the exhaust valves and in to the exhaust manifold. And so on.
If you can picture all this, then you can see that the exhaust valves open fully before top dead centre (BTDC), and the inlet valves open fully after top dead centre (ATDC). The timing angles given by the camshaft manufacturer is critical. Both camshafts are designed to operate at precise points during the rotation of the crankshaft, so it is very important that the camshafts are timed in accurately. To do this, you must use a set of vernier pulleys. The stock pulleys have no adjustment in them, and once they're locked in place at 60ft/lb torque with the pulley bolts, its impossible to make subtle changes to the timing. Vernier pulleys allow adjustment +/- to 1/10ths of a degree so you really can set the positions much more accurately.
OK, sermon over. Lets have a go at timing the new cams in (There's nothing to be afraid of, it's a straight forward procedure, using mechanical alignment and adjustment.)
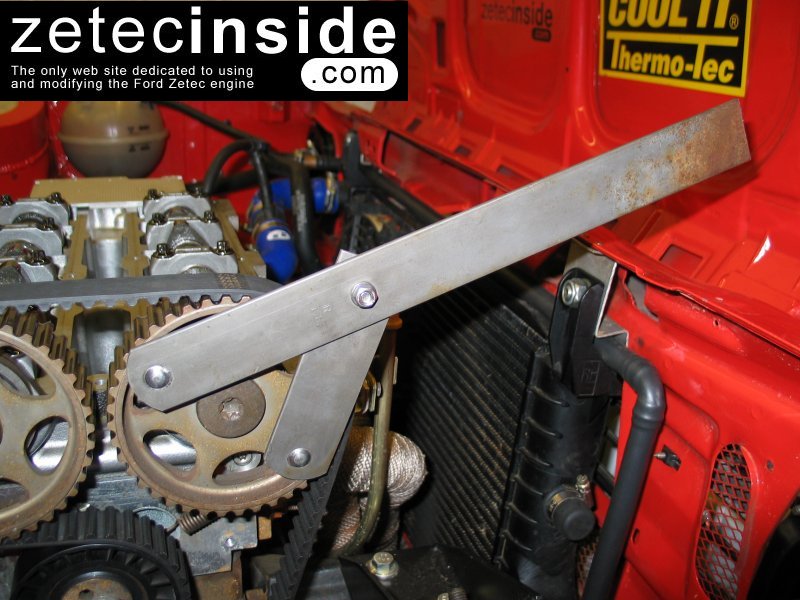
You will need a timing disk (disk showing 360 degree markings); a piece of stiff wire to act as a marker for the timing disk; a dial gauge and stand; cam-lube.
HINT: to make the task of timing the cams easier, once you've refitted the cams after drilling and fitting the dowels [see below], coat the cam lobes with cam lube. This treacle like liquid protects the cam lobes from damage during the running-in period, and also stops the cams from rotating when you release your grip after rotating them by hand. Without the cam lube they tend to snap back to a different resting position when positioning the cams by hand.
Timing in the cams
- You basically find top dead centre of piston number 1, and zero the timing disk which you've fitted to the crankshaft pulley. Use a piece of stiff wire to point to the 0° position on the timing disk, attaching the wire to a suitable location on the engine via a fastener/washer. The piece of wire (marker) must not move once you've aligned it.
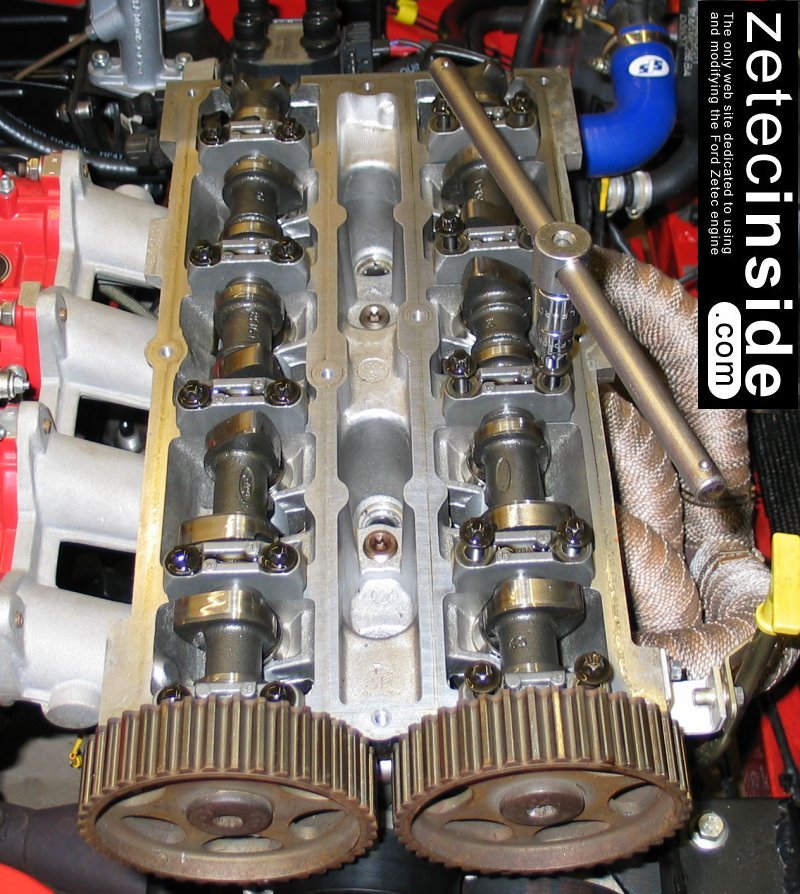
- Then turn the crank clockwise (as viewed on the crankshaft pulley) to the 110° position, and using a dial gauge on the inlet camshaft tappet for cylinder number 1 (nearest the timing belt), turn the inlet camshaft by hand until you find full lift (not forgetting to take in to account the dwell angle). The pulley is then timed in at 110° which is the specification for the Piper BH270 camshaft. Tighten the pulley bolt by hand so that the pulley won't rotate on the camshaft. Do not tighten the pulley bolt to the final torque setting at this point, just tighten by hand. Lock the four vernier pulley adjuster bolts securely. We will use these to fine tune the position of the camshafts later.
- Now carefully fit the timing belt so as not to disturb the position of the camshaft, and now turn your attention to the exhaust camshaft.
- Turn this to roughly the same orientation as the inlet camshaft (so that the slots in the ends of the two cams look like they're both at the same position), and again fit the cam belt to the pulley. And again tighten the pulley bolt by hand.
- Remove any slack from the timing belt and adjust the timing tensioner accordingly.
- Turn the crankshaft anticlockwise back to the 0° (TDC) position, and then turn it anticlockwise again, through to 110° BTDC. Now turn the exhaust camshaft by hand to give full lift on cylinder number 1, again using a dial gauge to measure full lift on either of the #1 cylinder's two tappets.
- Lock the four vernier pulley adjuster bolts securely.
- Rotate the engine by hand through two clockwise revolutions and check the timing figures again, at 110° ATDC and 110° BTDC for both camshafts. You'll find that the timing will have slipped, and will need adjusting again. Repeat the above few steps for the timing of the inlet and exhaust camshafts.
Once you've done all this, you will need to drill and fit the supplied steel dowels so that the centres of the new vernier pulleys cannot rotate on the ends of the cams, should the pulley bolts come loose. Mark the position of the hole through the hole in the aluminium vernier pulley, and remove both the cam shafts. This will undo all of the above work, but not to worry, practice makes perfect. Carefully drill 6.5mm holes in the ends of the cam shafts, where you marked them, and fit the dowel pin using threadlock to stop them from falling out. Refit the cam shafts to the engine, refit the pulleys, and repeat the timing procedure above. Once complete, tighten the cam shaft retaining bolts to 50-60ft/lb. Rotate the engine another couple of turns, and use the vernier pulleys to accurately set the timing to that specified by the manufacturer. Remember: Once you've set the cams up, you should still get the car dyno tuned, so that the dyno operator can swing the cam timing to get maximum power from the engine.
That's really is all there is to it. If you've followed the above carefully, and you're confident that the valves are opening without hitting the pistons, you could spin the engine over on the ignition now, without the plugs fitted, and you should find that it spins over nicely, with no problems. Next step is to pour more cam-lube over the cam lobes, refit the cam cover, plugs and plug leads, and start the engine. You must run it at 2000rpm for 20 minutes when you first run the new cams. This will bed them in. You may hear some tapping when you first do this, its just the tappets and the new cam lobes working against each other, and after 10 minutes or so it should quieten down.